Making Art In Viral Times

I don’t know about you, but I am struggling to make art during the pandemic. I am in the company of others all day, I am having trouble sleeping, and each day seems to bring news that is disturbing or maddening or devastating. I am making small collages daily and taking some online classes to help guide me in the creative process, but making a large project that takes multiple days to finish seems too daunting.

There is only one exception to this; a new artist’s book called Art I Can’t Make Right Now. It is a palimpsest; a book written over the text of another book. It is mostly a stream of consciousness about our times that I typed on my vintage Underwood portable typewriter. I want to shout, but my voice is so small. Who will hear what I say? Maybe you will.

The 100 Day Project

In this strange time we find ourselves living through, I thought it might motivate me to make art if I was following a challenge. Enter The 100 Day Project. It is on its 7th year and although I have followed others journeys for these 100 days, I have never been brave enough to commit to doing it myself. I decided to choose something relatively simple and straightforward as my personal challenge and here it is.

I will make collage postcards with a theme inspired by the alphabet and my collection of ephemera. I will then mail out the postcards to friends, family, and people who ask for them via Instagram. Here are my first 10 postcards with architecture and birds as the themes.

Mica Sample Book Workshop

I will be offering a mica book workshop this fall (probably early November) through San Diego Book Arts’ Book Art Basics class. Below is the sample book I made for the class. We will learn different surface techniques, ways to attach mica to other materials, and a binding style that I invented for this class. I will post again when the date is set and the class is available for sign up through SDBA’s website.

Weaving Through Winter

I spent 30 days in January and February taking an online weaving class with Helen Hiebert. I took the same class last year as well and it was worth repeating. Helen is a generous teacher and the other participants shared their weaving talents as well as daily encouragement. I recommend taking this class if you are any kind of paper enthusiast. Here are some pictures of my favorite woven pieces from the class.

Are You Book Enough

A while back I saw a book arts challenge on Instagram called” Are You Book Enough.” The idea was to create an artist’s book on that month’s theme, post it and choose your nine favorite books and post them as well. I watched for several months as very creative people posted and finally dipped my toes in with the July prompt: Time. To learn more about the project check out Sarah Mo’s website. She is the creator of this challenge and has given me a much needed inspirational boost.

Here are the books I have made so far and their themes. If you want to see more go to Instagram and search the hashtag: #areyoubookenough.

July Are You Book Enough-Measure: “Ancient Stories”

July Are You Book Enough-Measure: “Ancient Stories”

“Ancient Stories” open

“Ancient Stories” open

August Are You Book Enough: Into the Woods “Pinwheel Poem”

August Are You Book Enough: Into the Woods “Pinwheel Poem”

“Pinwheel Poem”

“Pinwheel Poem”

September Are You Book Enough-Ticket: “Whirlwind Japan”

September Are You Book Enough-Ticket: “Whirlwind Japan”

The Paper Year

This blog has been on hiatus for a bit and now I have so many things to share with you. I plan to create several posts this week to catch up.

First, an announcement… I am thrilled to be included in the 2020 calendar created by Helen Hiebert called The Paper Year. In this workbook, paper projects are offered for each month of the year. There is a calendar feature as well as space for you to save paper samples and write about the project or how you might want to modify it. In short, you get a multi-function book with calendar, workbook and project features. Helen asked me at the beginning of the year to contribute a project and I chose my crane card. I hope you will check out the link here and order your copy. Early bird orders (before October 15) receive a free gift while supplies last. If you love to make beautiful objects with wonderful papers then this is the book for you.

Screenshot_20191001-111735.png
Source: https://helenhiebertstudio.com/shop/the-pa...

30 Paper Weavings in 30 Days

I recently completed a 30 day online class run by Helen Hiebert called Weaving Through Winter. The class had a very open structure, Helen did a 30 minute video introduction each week on a theme and workshop participants could take the concept and run with it. We posted pictures of what we made and offered comments and suggestions to each other. It was a wonderful daily practice and meditation. If you want to see all 30 of my pieces check out my Instagram posts at @gina_pisello. I will show you my favorites below and tell you a bit about what inspired them.

Enjoy!


This is one of the last pieces I made in class. I was inspired by weaver Kay Sekimachi and light streaming onto the red paper before sunset.

This weaving went through several stages before becoming the piece at the bottom. I tried folding an origami bowl with it, but the shape and size of the weave was wrong for this particular origami piece. I would like to try again with a different weaving pattern.

I wove abaca paper strips together then folded it into a Tomoko Fuse spiral. I love the way this turned out.

A simple weave around a silhouette.

I didn't know what to weave on this day but found inspiration in torn paper torsos I made years ago that sit framed on my desk. This one was hard to weave, but I really like the results.

This is a Danish heart basket, commonly made at Christmas time. I used folded paper and wove a love letter with a Japanese paper bag for this simple weaving. There are many more designs for this if you search Pinterest.

One week of the course was about weaving shapes. I wanted to do a simple circle and the tension of the weaving caused this to curve nicely off the page.

I experimented with hexagonal weaving trying to work out the formula for doing so. Turns out quilters have a way of doing this called triaxial weaving. I liked building this out from the center, but want to try doing it the "right" way sometime soon.

The completed hexagon weaving.

Another hexagon weaving.

I remembered that Claire Van Vliet and Hedi Kyle invented ways to weave books together in the excellent book Woven and Interlocking Book Structures. This one is my favorite with its crossing shapes and locking structures. I created the pages with eco-dyed paper.

This was an early weaving from the class. I wanted to explore strips that were angled. I like the optical illusion of it.

This is one of the later weavings. I cut warp strips around the leaves on the eco-dyed paper. Then I cut weft strips one at a time to bend around the leaves. I wanted to enhance this central image. 

Nesting Blizzard Boxes

Hedi Kyle and Ulla Warchol have written a wonderful book called The Art of the Fold.  My last blog post was about samples I made from the book. Today, I want to present a modified version of one book that I have come up with. I will introduce other works I have made using Hedi's structures as a jumping off point in a later post. I am including a diagram of measurements, divisions and how I folded this new work. You will need lightweight, but sturdy paper that measures 6 x 18 3/8 inches. You will also need to score many of the divisions between sections. Do so accurately and you can fold this project. I used Hedi's directions for folding the boxes and added the extra "bridge" section between boxed so that they can fold inside each other. Each box gets slightly wider to accommodate the precious one.

I hope you try it and let me know in the comments what you think.

Enjoy!


Diagram showing how to divide the paper before folding. Each 3 square division represents 1 inch. The first 8 divisions are exactly 1 inch each. The next 2 are 1 1/16 each followed by three 1 inch sections ( labeled side, bridge, side). Finally there are two 1 1/8 sections followed by three 1 inch sections. I made a model of this on graph paper to make it easier to score the lines. Then I moved on to decorative paper.


Here is the structure folded and ready to pop into boxes with bridges between them.


Here are the boxes from the back showing the extra section between them. This extra paper is necessary to act as a hinge to allow each box to fold inside the next one.


The boxes beginning to be nested.


All the boxed are nested inside the largest one. You can make this with more box sections by increasing the width of each box by 1/8 inch. Good luck.


The Art of the Fold

Hedi Kyle

was my favorite book artist before I even knew her name. I learned several of her structures early on in my book making career and loved them for their versatility. You can imagine how excited I was when I heard she was writing a book with her daughter Ulla Warchol that I could peruse at my leisure. I was also hoping there would be new structures to try. The book arrived on October 2 and I got busy making samples and experimenting with structures right away. I was enthralled by the easy to follow diagrams and the paper suggestions as well as information on changing dimensions. Below are pictures of samples I made using my stash of papers and book cloth.

Enjoy!

My samples so far from this amazing book!

My variation on the tree fold introduces a long leaf followed by a short one and then a long one. That way half of the leaves (pages) are hidden from view. The possibilities for a book are endless.

The same book open.

The Blizzard Box invented by Bill Hanscom and Hedi Kyle. I also make a square version (in blue).

The Blizzard boxes nested and holding some of my sea glass.

The Star Box is very satisfying to make as Hedi's dimensions give you a perfectly nested box and cover all in one.

Three variations of the School Book Wrapper, 2 with pleats and one without. I used book cloth to make these as it is sturdy and folds nicely around journal inserts.

This structure was new to me and I loved playing with the pop-up. I ended up creating a shape that I could fold into cranes.

I love the simplicity and creativity of this book. The triangle structure is unusual, but it fits so nicely into the covers. I can't wait to use it for an actual artist's book.

Another simple, but effective book structure is this Pocket Accordion with Separate Cover. I had fun coming up with the cat closure.

The Crown Greeting Card is lovely and easy to make.

I have made many Blizzard Books over the years; it was one of the first Hedi Kyle structures I learned. I never thought to create this kind of structure though. Thank goodness for Hedi and this book!

The Telescoping Ziggurat was a new structure to me and I enjoyed folding it and creating two pieces from one structure by cutting the very long strip of paper on the diagonal so that it rises up like a tower.

Paper + Embroidery

I am trying out a new (to me) art form; embroidery. But since it is me I am embroidering on paper, photographs and maybe money. I was inspired by a picture of an embroidered envelope I saw on a video. I like using paper as it is stiff and doesn't require a hoop to hold it in place, but care must be taken when making holes as too many will cause the paper to tear. Here are my results so far.

Enjoy!

-Gina

My first attempt at embroidery on paper. 


Practicing French knot and leaf shapes on scrap paper before trying them on the envelope.

What about embroidering on a photograph?

It's a bit messy, but it works.

The long stitches in the background are my attempt at the Japanese Sashiko technique. More practice is needed, but I like the results so far. What do you think?


TInception: or Binding a Tin into a Book

I ordered some beautiful eco-dyed silk noil from Tierney Barden last week and she sent some extra goodies along in the package. One of them was a little yellow tea tin and when I saw it I knew that I wanted to try binding it into a book. I got the idea from Andrea Matus DeMeng in her Propsero's Books class last month. When she was teaching us the coptic stitch she said she had bound a mint tin into a book. I was intrigued and wanted to try it myself.

My daughter Lila saw the first book and joked that I should bind a tin book that fits inside another larger tin and so on, hence the title of this blog and the title of the book she inspired: TInception.

I hope you like the pictures.

-Gina

Mica and Tintype photo cover for my first tea tin bound book.

Coptic stitch is used to sew the signatures and tin together.

Book parts ready to be sewn.

The finished book. I actually resewed this book (not shown) as I made some adjustments on the second one that I wanted to incorporate in this one as well.

Signature on left and tin on right.

Back of the tin and the next signature.

The tin contains some bits Tierney sent me and 3 pamphlet stitched booklets.

Tin contents.


Another signature in the book. I like using vintage papers and photos to give books a sense of time and place.

More book pages/signatures.


TInception; for each book level you descend it becomes an order of magnitude harder to bind! The top level book measures 4 x 2.5 x 1.5 inches.

The bound tin (right).

Book two inside book one. This book measures 2 3/8 x 1 5/8 x 3/4 inches.

The tin bound in book two (right).

Tin book three measures 1 3/8 x 1 3/4 x 1/2 inches. I could only put on a front and back cover before running out of room in the larger tin. It was still the hardest one to bind.

All three books showing their relative sizes.

The 3 little books bound and nestled inside the final tin.

All 3 books showing the photos and mica covers.

The binding of each book.

I used mica and antique writing from autograph books or inscriptions from old books as the back covers. I love the way the natural mica has inclusions that look like ink spots.


How to Cut and Fold a Weekend

I spent a hot and fun weekend with a wonderful group of fellow artists and my dear friend Bhavna Mehta cutting, folding and playing with paper. Bhavna is a patient teacher who always takes this everyday item to new heights with her cutting techniques. The workshop focused on cutting and folding paper which created some lovely effects. Everyone made the same cube, frame and cuff projects, but the diversity of results was stunning and inspiring. Please check her Instagram feed for pictures of other people's projects and see mine below. I am off to cut some more!

-Gina
The completed planetary system cut box piece.


The cube unfolded and partly cut.

The finished cube,

Beginning to cut the ring and cuff piece.

Many erasures lead to a design I am happy with.

What remains.

The cut cuff.

Wearable art.

My framed insert so far. (Front)

All the cutting left to do. (Back)

Late day sun creating interesting shadows behind this piece.

Another view with different shadow effect.


Playing Origami Detective

I follow someone on Instagram who posted an intriguing picture the other day of a folded origami envelope/box.

URL: https://artsandculture.google.com/exhibit/0gIihjYd3lscJQ  (Click on the right arrow 3 times to get to the correct page.)

She asked if anyone knew how to fold it and I thought, "That's easy, it's just a twist fold but on the back side." I didn't have time to study it that day, but yesterday I decided to tackle the problem. I tried several folds that I thought would work and they didn't. Then I tried something that seemed similar, but wasn't. Then I desperately tried to find the directions online. There were none. I stared at the image and tried to unfold it in my mind and couldn't quite see it. I decided to take a break and come back to it today after finding a YouTube video that made a similar fold called the square tato.

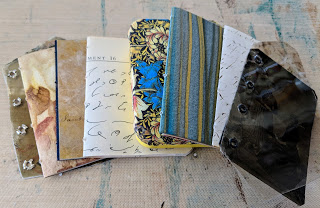
Long story short, after much trial and error I figured out how to fold the envelope called an Ori-Sue used for holding slips of paper that have scent names written on them. This is used in the Japanese tea ceremony from what I could find out. Maybe you would like to try folding this lovely little envelope.

-Gina


Crease pattern for Ori-Sue fold. Red lines are mountain folds and blue lines are valley folds.

Start with a square piece of paper. Different colors on each side make for a more dramatic final product.

Mark the center of the paper by folding in half and pinching each side. Do not crease. Then fold up one side past the center (so more than 1/4 the paper width) but less than 1/3 the paper width. For example, if your paper is 6 x 6 inches, fold up the side more than 1.5 inches but less than 2 inches.

Left sample has sides folded to 1/4 the length (in other words each side is folded to the center of the paper) and there is no center square. The middle sample has sides folded into thirds and the whole center is the twist triangles with no edges. The sample on the right is what we are trying to make and is folded between 1/4 and 1/3 the paper width.


Fold in the corners creasing very lightly to mark the square. Fold up the two sides to the point where the diagonal meets the edge of the paper. This will give you the same width as the first fold without having to measure.

If you have done things properly the two sides should overlap each other, but not meet at the folded edge.

Rotate the paper 90 degrees. Again fold the corners in lightly to meet the straight fold and mark on the paper's edge. Fold the last edge up to this diagonal mark. Now all for sides are folded. You have a square in the center of the paper and four squares at the corners. Crucially, you have rectangles between the corner squares on the four sides of the paper. 

Next you will fold each side up and fold in the left side corner to meet the vertical line as shown above. Repeat on all four sides, only folding the left corner up. Fold the corner to the back of the paper as well to make the last step easier.

Your paper should now have all of these folds (minus the red and blue lines). It's time to collapse.

To collapse the model, fold up one side then fold back along the diagonal on the right side. Fold in the corner and turn the model 90 degrees counterclockwise.


Fold up the second section the same way, folding in the side then the corner. The center square starts to take shape.

Fold in the third side the same way then open up the first side at the top left corner to tuck in the last corner mountain then valley folds.

Pinwheel the four sides overlapping them to form the final shape.

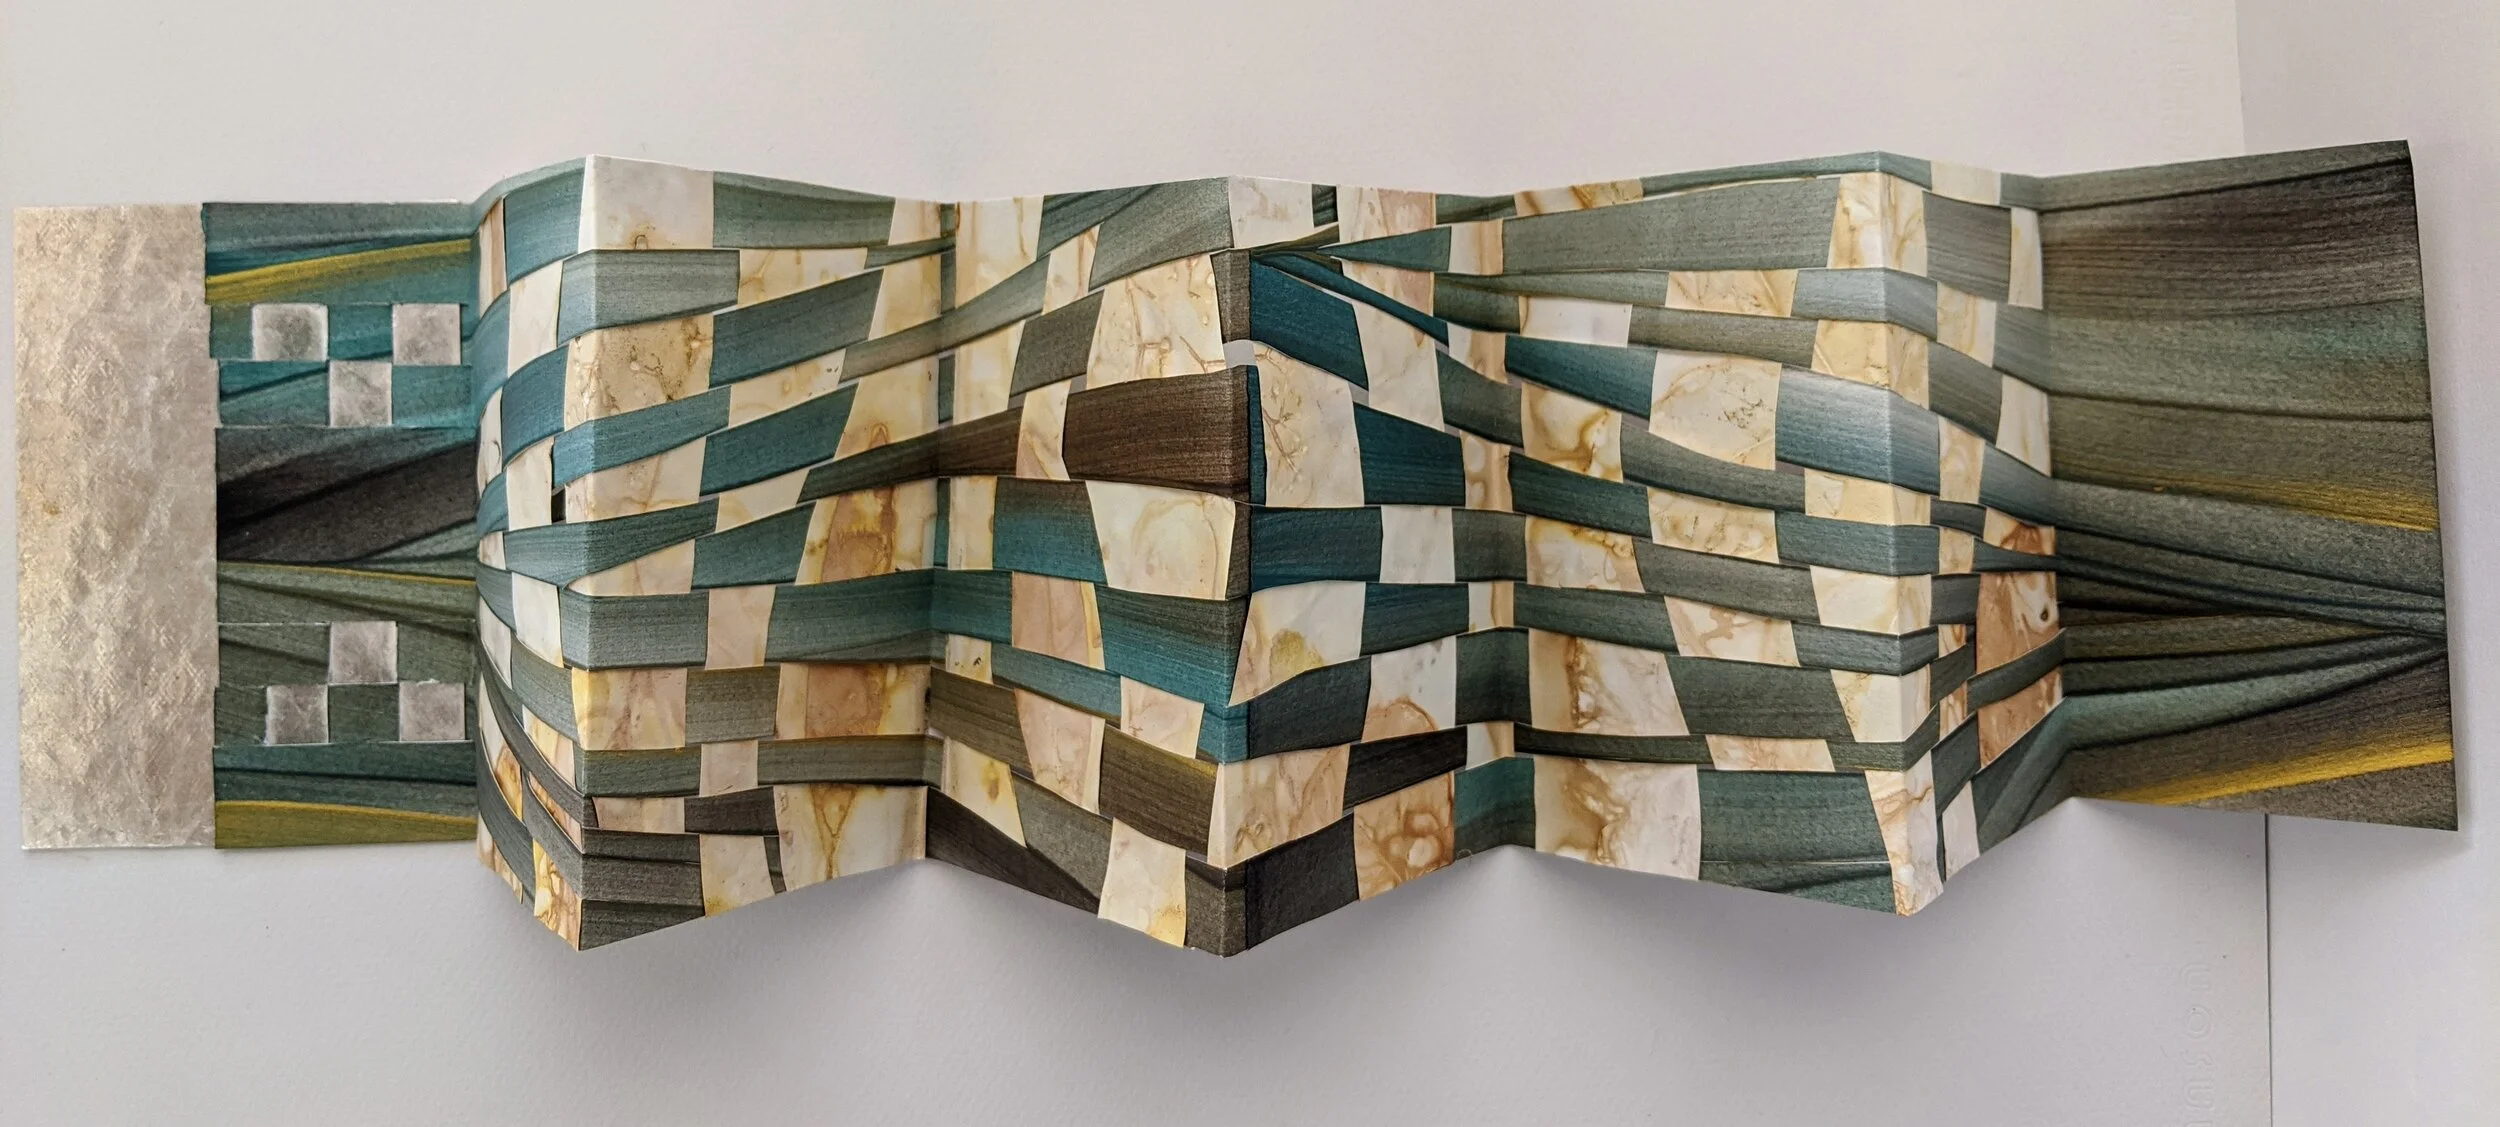
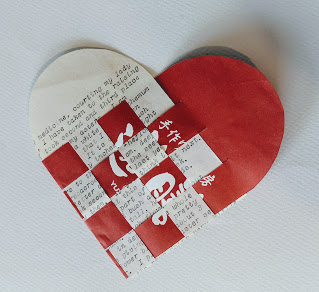
Here is the final model. You can make the square of contrasting color bigger or smaller depending on how close to 1/4 or 1/3 you fold the first side of the paper. Play around and see which size you like best.

Prospero's Books

I recently spent 5 days in Idyllwild, CA at their Art Center taking a class from Andrea Matus DeMeng , intriguingly titled Prospero's Books. We had an ambitious plan to make 4 different books and decorate a wooden box to hold them all in just 4 days! It was a busy and creative time and I didn't finish everything there. I am still not really finished, but here is my version of Prospero's Books so far.

Enjoy!

-Gina

Prospero's Books: The Book of Harsh Geometry, The Book of Mirrors, The Primer of Small Stars, and The Book of Architecture and other Music.

A different arrangement of the books.

The Book of Mirrors, coptic stitched with folded signatures and single sheets bound together.

A page spread in the Book of Mirrors.

The Canadian binding was used for the Book of Architecture and other Music.

A page spread from the same book.

The Primer of Small Stars is of course a small book bound using long stitch.

The case bound Book of Harsh Geometry resonates with me as Geometry was my most difficult class in high school. I barely passed. I also find case binding difficult so they work well together.

Page spread from Harsh Geometry.

The Book of Water, long stitch binding.

I used plastic sheets to create this book's pages as I wanted the contents to look like water.


Mica Book

Making a book with mica pages presents some challenges. If you use natural mica, you can't glue or tape it as the top layer will simply pull away and leave the rest of the mica sheet unattached.  There is also the issue of binding a single piece of mica without a center crease to sew into. One solution is to use Keith Smith's Sewing Single Sheets method, but I don't like sewing if I can fold instead. So, to make my book I used Beauty in Use's slot binding method shown in Claire Van Vliet and Elizabeth Steiner's  Woven and Interlocking Book Structures. The pages vary in size and width, with the bound edge and bottom squared up. This gives the book an irregular top and fore edge, which I like.

Hope you enjoy!

-Gina

Preparing the binding strip.

Mica ready to have the corners cut.

In the middle of adding the mica to the binding. This method uses slits cut into the paper as well as the corners of each page. They go in opposite directions and make a perfect fit when bound.

The finished book. I love this kind of mica with red, blue and black inclusions. It looks like ancient writing or a secret star map.

A top view of the book.

The end.

Shows to See in SD

I am honored to be included in the Mesa College Gallery juried show "Art That Cuts" opening April 12. There was a write-up in the San Diego Union Tribune that you can read here. I created a new piece for the show that went through some revision before making the cut. Below you can see some of the missteps I took along the way to the finished piece.

And now for a bit of art philosophy... When I make a piece of art, especially something new, I have to make lots of decisions about size, color, structure, etc. Yesterday I finally started working on a book structure that I have been putting off. It occurred to me that the decisions I made were probably not the same decisions I would have made had I worked on it sooner or later. In other words, the art I make is time and place dependent. I make certain decisions today that I may not make tomorrow or yesterday. Making a specific piece of art is temporal as well as physical. Okay enough philosophy. Onto pictures...

Enjoy!

My first idea was the branches at the top of this image. Then I tried the curving shapes in the foreground. I didn't like either one.


Next I tried the curve running across the folds instead of being defined by the folds. I didn't like this either.


Next I sketched ideas for cutting the triangular sections above. I finally decided on the shape on the left that looks kind of like a dragonfly wing. This is a cut out that I have used before on a different spiral and I was trying to avoid repeating myself, but I couldn't come up with a better way to fill the space.


My final cut paper has the wing shapes cut out along the central spine of the piece.


Here is the finished folded and sewn piece titled "What Remains."


It looks best in motion.


In Which I Revisit Spirals

I put spiral play on the back burner for much of the second half of 2017, but as the year was coming to an end, I was folding a piece of origami paper diagonally and it reminded me of how I start folding a spiral. The only difference is that spirals use trapezoid shaped paper and this was a square. I decided to try folding it anyway and it worked well. I was journaling about the experiment and wrote "I wonder what would happen if I folded a rectangle corner to corner and spiraled it?" So I did that too and recorded my results in diagrams and samples. Here are the results.

Enjoy!


The first trial using origami paper. This photo shows the model closed.

Here is the model open.

There are two ways to crease the diagonals with the rectangle. Here is version A where I scored each side of the center line from the top of the horizontal line to the bottom corner of the next one. This creates different angles on each side of the model, but it still collapses.

In version B I just scored with the center line folded and creased from the top to the bottom of the longer edge of each horizontal section. That means the diagonal angles are the same on each side, but where they end differs. It looks very much like version A, but is easier to score and collapse.

Here is the model open. I like the way the leaf shapes cross each other in this model. It is very dynamic.

Sculpting Dyed and Painted Papers

I have been eco-dyeing paper for a few weeks. I also played around with another Leslie Marsh technique which uses paint to print leaves onto black paper. With lots of paper piling up on my work table I decided to turn some of them into a paper sculpture. Here are the results.

Enjoy!

Some of the painted leaf papers. Mom and I used Ranger Dylusions paints and a gel press plate to make these. Roll paint on the leaves, brayer a contrasting color on the gel plate, apply the leaves, place black paper on top and press. This technique is so fun and fast that I made about 20 pages in one sitting. 

I used the painted leaf papers to make the book spine. In my other blog post about this structure I used a single sheet of paper cut and folded to make the spine. Here I used a different sheet for each section then used leftover painted paper as hinges to hold them together.

I used the pale Texoprint paper from week 2 ago for the folded inserts. 
I like the contrast of the dark and light papers.

This is the finished sculpture. I love the shapes and colors and subtle leaf patterns everywhere.


Still Eco-Dyeing: Week 3

I am still playing around with eco-dyeing a month after taking Leslie Marsh's workshop. I usually get distracted by a shiny new technique, but I think this one appeals to my science brain. I am experimenting with different papers, plant materials and water baths. I just want to keep trying out new combinations. Here are the results from this week's batch.

Enjoy!

I used Arches Textwove and Somerset Book paper for this week's project. I cut the large sheets (20 x 26) into 3 long strips, sprinkled leaves on top and rolled them onto my copper tubes. They were tied with twine and boiled for 1.5 hours in water, vinegar and Ranger Distress dye (Vintage Photo). 

1. Spanish moss, onion skin and eucalyptus leaves sprinkled on Arches Textwove.

2. Liquid amber, spanish moss and eucalyptus leaves on Somerset Book paper.


3. Onion skin and liquid amber on Arches Textwove.

The papers still wet from dyeing are number 3, 2, and 1 from left to right. The Arches came out the best again with the Somerset looking pretty, but pale in comparison. The onion skin surprised me with its orange-brown color. I was hoping for purple. The edges of the papers did come out purple so that may be where the color went. The liquid amber seems to be very yellow in the recent batches I have made. I continue to enjoy the process and the results.

Here are the finished papers, cut down and folded to fit in my journal.

 Please check out my next blog to see what I made with some of last week's papers.

Adventures in Eco-Dyeing: Week 2

I am still fascinated with eco-dyeing and spent time making two different batches of paper. I am playing with paper types and ways of dyeing. Here are the results so far.

Enjoy!
Method 1
This dyeing process involved placing leaves and flowers between folded sheets of watercolor paper. They were sandwiched between two ceramic tiles and boiled in water and vinegar for 1.5 hours. RIT dye (Jeans color) was added 10 minutes into the steep time. 

Issues with this method: 1. The color faded quite a bit after the sheets dried so I used Distress Micro Glaze to bring up the color and seal the pages. 2. The center folds on the pages were weakened by the boiling process. Several pages tore either while wet or after drying. 

Conclusions: I like this method of dyeing, both with the addition of the blue dye and sandwiching the paper flat instead of rolling it. There are no string marks and both sides of each page have good coverage with leaf shapes. Also the open pages are mirror images which makes interesting patterns.


The journal I made from the blue and eco-dyed papers.


Method 2

This trial was more like the way we dyed our papers in Leslie Marsh's class. I made cooper tubes from some cooper sheeting I had lying around and stacked paper with leaves then rolled them up around the cooper. I placed a large leaf on the outside of each bundle before rolling so that there would be vegetation on the outside instead of just string. I used 3 kinds of paper in this experiment to see how each would take the tannin and color from the vat. I used Liquitex Muted Pink dye to color this pot as well as eucalyptus bark.

Issues with this method: 1. Rolling the thicker, cover weight paper caused it to wrinkle and tear. 
2. Some of the paper took the dye and tannin well and some didn't. 

Conclusions: I like this method for the thinner paper and I can use a smaller pot and still dye large sheets of paper without creasing them before boiling. 


Dyed paper while still wet. 
These strong colors are on Arches Textwove and cover weight Neenah paper.


These very pale papers were dyed at the same time as those above, but this is Texoprint paper and it didn't take the colors as well. I kind of like the ghost-like prints though.


Cover weight paper dry.

Arches Textwove paper dry.

Texoprint paper dry.